Resupply Strategy on the John Muir Trail
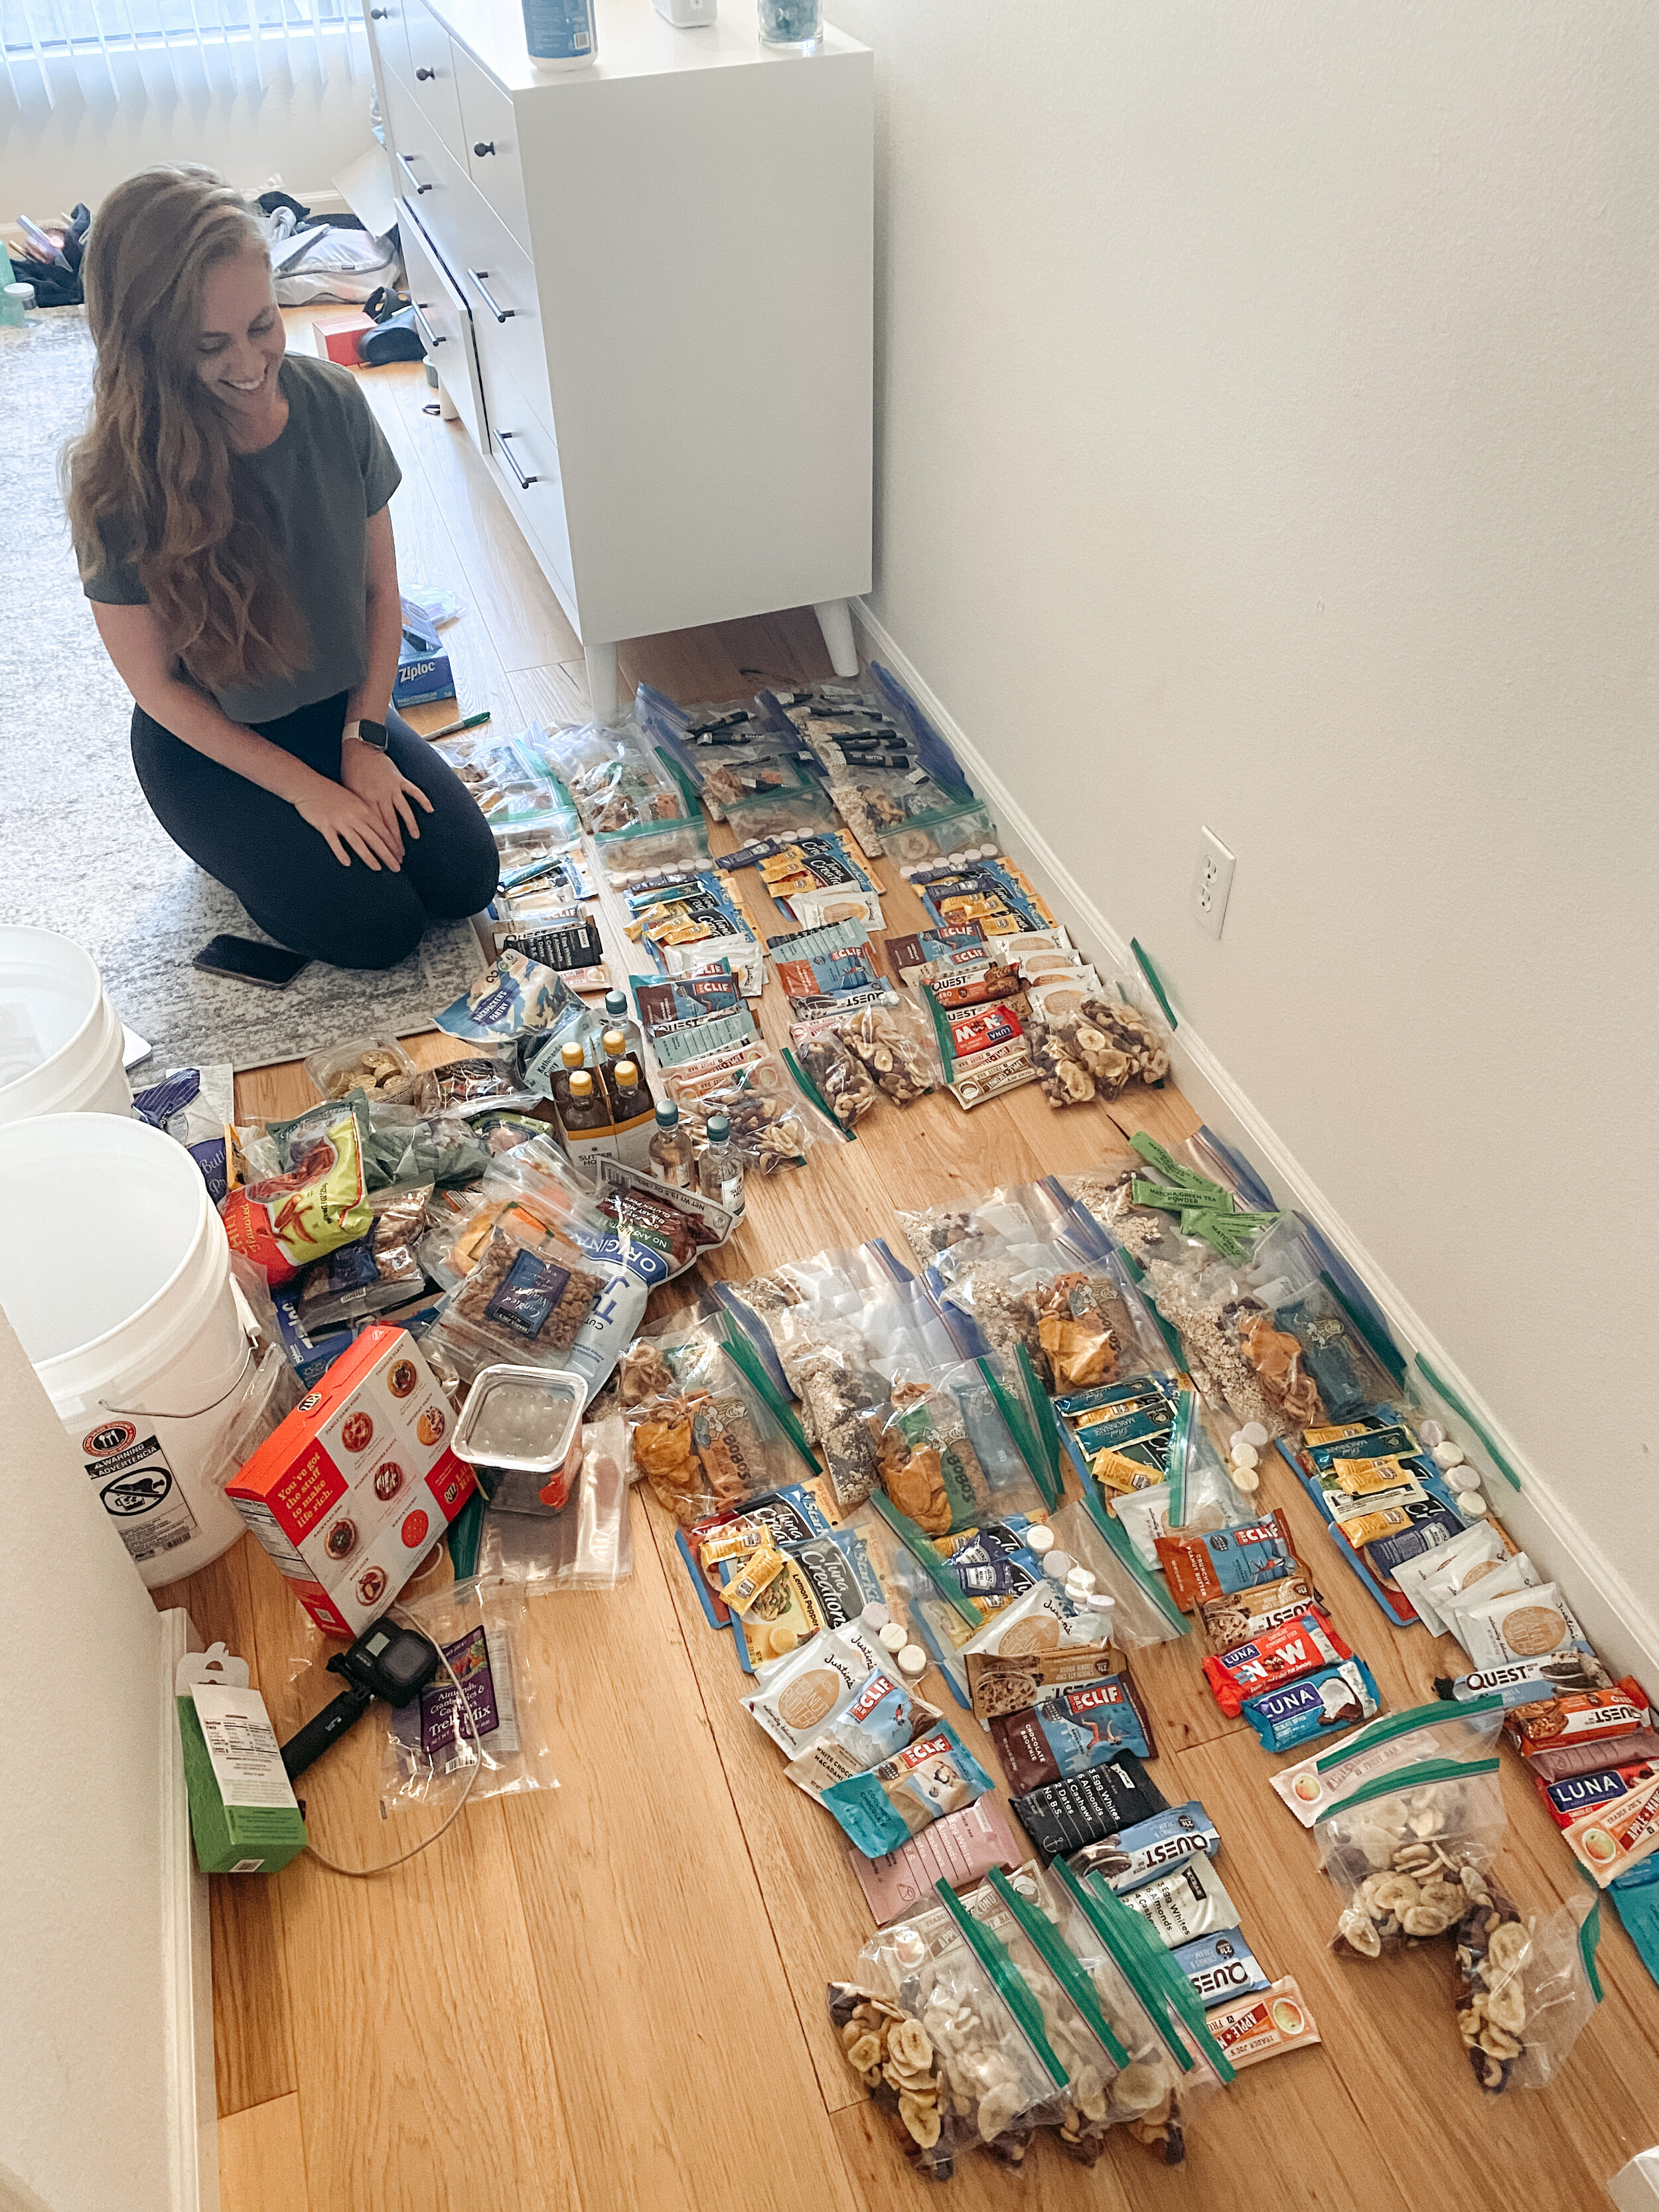
Three weeks of food laid out all over my apartment. I literally couldn’t see the floor. At this point, I had scored a permit, planned my itinerary, bought my gear, and was finally digging into the most challenging step. Resupply.
Once you know your itinerary and how many days you’ll be on the trail, you can strategize your resupply plan. My itinerary put me on trail for 18 days with three resupply stops. Those stops included: Red’s Meadow (mile 60), Muir Trail Ranch (mile 108), and Onion Valley (mile 195.6). I never carried more than six full days of food. If you plan to complete the trail in fewer days, you may only need two stops. If you choose to take a longer trip, you may need more stops. Thankfully, there are many great resupply options on the John Muir Trail.
What are my resupply options?
1. Tuolumne Meadows (mile 23)
Tuolumne Meadows isn’t always a necessary resupply stop, but it’s available if you need it. If you start in Yosemite Valley, you’ll arrive in Tuolumne Meadows by day two or three. They have a small restaurant, store, and post office. The post office is conveniently located next to the store and you can mail your resupply there.
Your Name
c/o General Delivery
Tuolumne Meadows Post Office
Yosemite National Park, CA 95389
Arriving by: ETA
You can contact the post office at (209) 372-8236 if you have questions. They are generally open from May to the end of September.
2. Red’s Meadow (mile 60)
Red’s Meadow is the first resupply stop for most southbound hikers. It’s conveniently located only a quarter mile off the trail, near Mammoth and Devil’s Postpile National Monument. They have a small store, hot showers, a café, charging stations, and phone service. They also have a campground for $23 per night (cash only), hiker cabins (bunk bed + 1 free shower) for $60 per night, and motel rooms for $120 per night. In order to resupply at Red’s Meadow, you first have to decide if you want to ship it or hand deliver it. If you choose to hand deliver, there’s a $3 per day hold fee. If you choose to ship it, follow these steps:
Step 1. Two weeks before you plan to mail your resupply, you must mail a completed authorization form and $40. The money can be paid online by credit card beforehand, or you can mail cash or a check. The mailing address is:
Red’s Meadow Resort
P.O. Box 395
Mammoth Lakes, CA 93546
Step 2. Pack your resupply into a 5-gallon bucket. If you plan to resupply next at Muir Trail Ranch, you will have 4 days of food in this resupply.
Step 3. Three weeks prior to your expected pick-up date, mail your resupply through U.S. Postal Service. I highly recommend shipping it through priority mail so you can see the tracking information. However, fuel cannot be shipped through priority mail so you’ll have to buy it at their store. Mail to this address:
Your Name
Red’s Meadow Resort
P.O. Box 395
Mammoth Lakes, CA 93546
If you have questions and would like to contact them, you can email that at info@redsmeadow.com or call them at (760)934-2345. They are normally open from June to the end of September.

Resupply day at Red’s Meadow!
3. Vermillion Valley Resort or VVR (mile 88)
Vermillion Valley Resort is located on the beautiful shoreline of Lake Edison and is one of the most backpacker-friendly resupply options. However, it will add about 14 miles total onto the trail if their ferry isn’t running. In my case, the ferry wasn’t running and logistically I didn’t need another resupply, but I still decided to detour and check it out. It was well worth it!
VVR has all the amenities you could want mid thru-hike: showers, beds, laundry, meals, charging stations, and free beer. Yes, I said free beer. All backpackers get a free cold beer when they arrive. The showers, beds, laundry and meals obviously aren’t free but worth it. VVR also has “hiker boxes” where you can put any food or gear that you no longer need, or take anything you do need. It’s the perfect opportunity to get rid of some unnecessary weight. They also provide the option to mail home anything you don’t want for a $12 fee plus postage.
Vermillion Valley Resort is open from May to October. If you choose to mail your resupply here, follow these steps:
Step 1. Package your resupply in either a 5-gallon bucket or a box. Label every side of your package with your name and pick-up ETA. Your resupply must weigh less than 25 pounds or you will be charged a $10 fee.
Step 2. Mail your resupply via USPS or UPS at least 2-3 weeks prior to arrival. The closest post office is two hours away so VVR only picks them up 1 to 2 times a week.
USPS:
Your Name
c/o VVR – General Delivery
Lakeshore, California 93634
UPS:
Your Name
Vermillion Valley Resort
c/o China Peak Landing
62311 Huntington Lake Road
Lakeshore, CA 93634
Step 3. When you pick up your resupply, you will be charged a pick up and storage fee. If you arrive between June and September, it costs $30. If you arrive in May or October, you will be charged $50. The payment can be made in cash or with credit card.
For more information, visit their website or give them a call at (559)-259-4000.
4. Muir Trail Ranch or MTR (mile 108)
The halfway mark of the JMT! Muir Trail Ranch is located only about a mile off the trail and is the last CONVENIENT resupply option if you are hiking southbound. If you choose to make this your last stop, you may be carrying up to 9-10 days of food for the rest of your trip. I voted against this and added one more stop after MTR as I didn’t want to carry so much weight.
MTR is a remote ranch that offers resupply as a side business. They primarily focus on their paying guests so most of their amenities aren’t available to everyone. If you choose to stay in one of their cabins, you can enjoy their restaurant, showers, bathrooms, laundry, and hot springs. If you choose to just resupply, you’ll only have access to their small store (sells fuel) and charging stations. They also have “hiker boxes” to get rid of food or gear you no longer need, and grab anything you do need. Similar to VVR, you can also ship home anything you don’t need for a $10 fee plus postage.
Muir Trail Ranch is so remote that it takes a 30-mile drive, ferry across the lake, and 5 miles of horse carry or off-roading, to get your resupply to storage. Therefore, it’s not the cheapest option. If you choose to resupply here, follow these steps:
Step 1. Pay for your resupply service fee of $115 (plus $2 per pound over 25 pounds) on their website. Print out all labels.
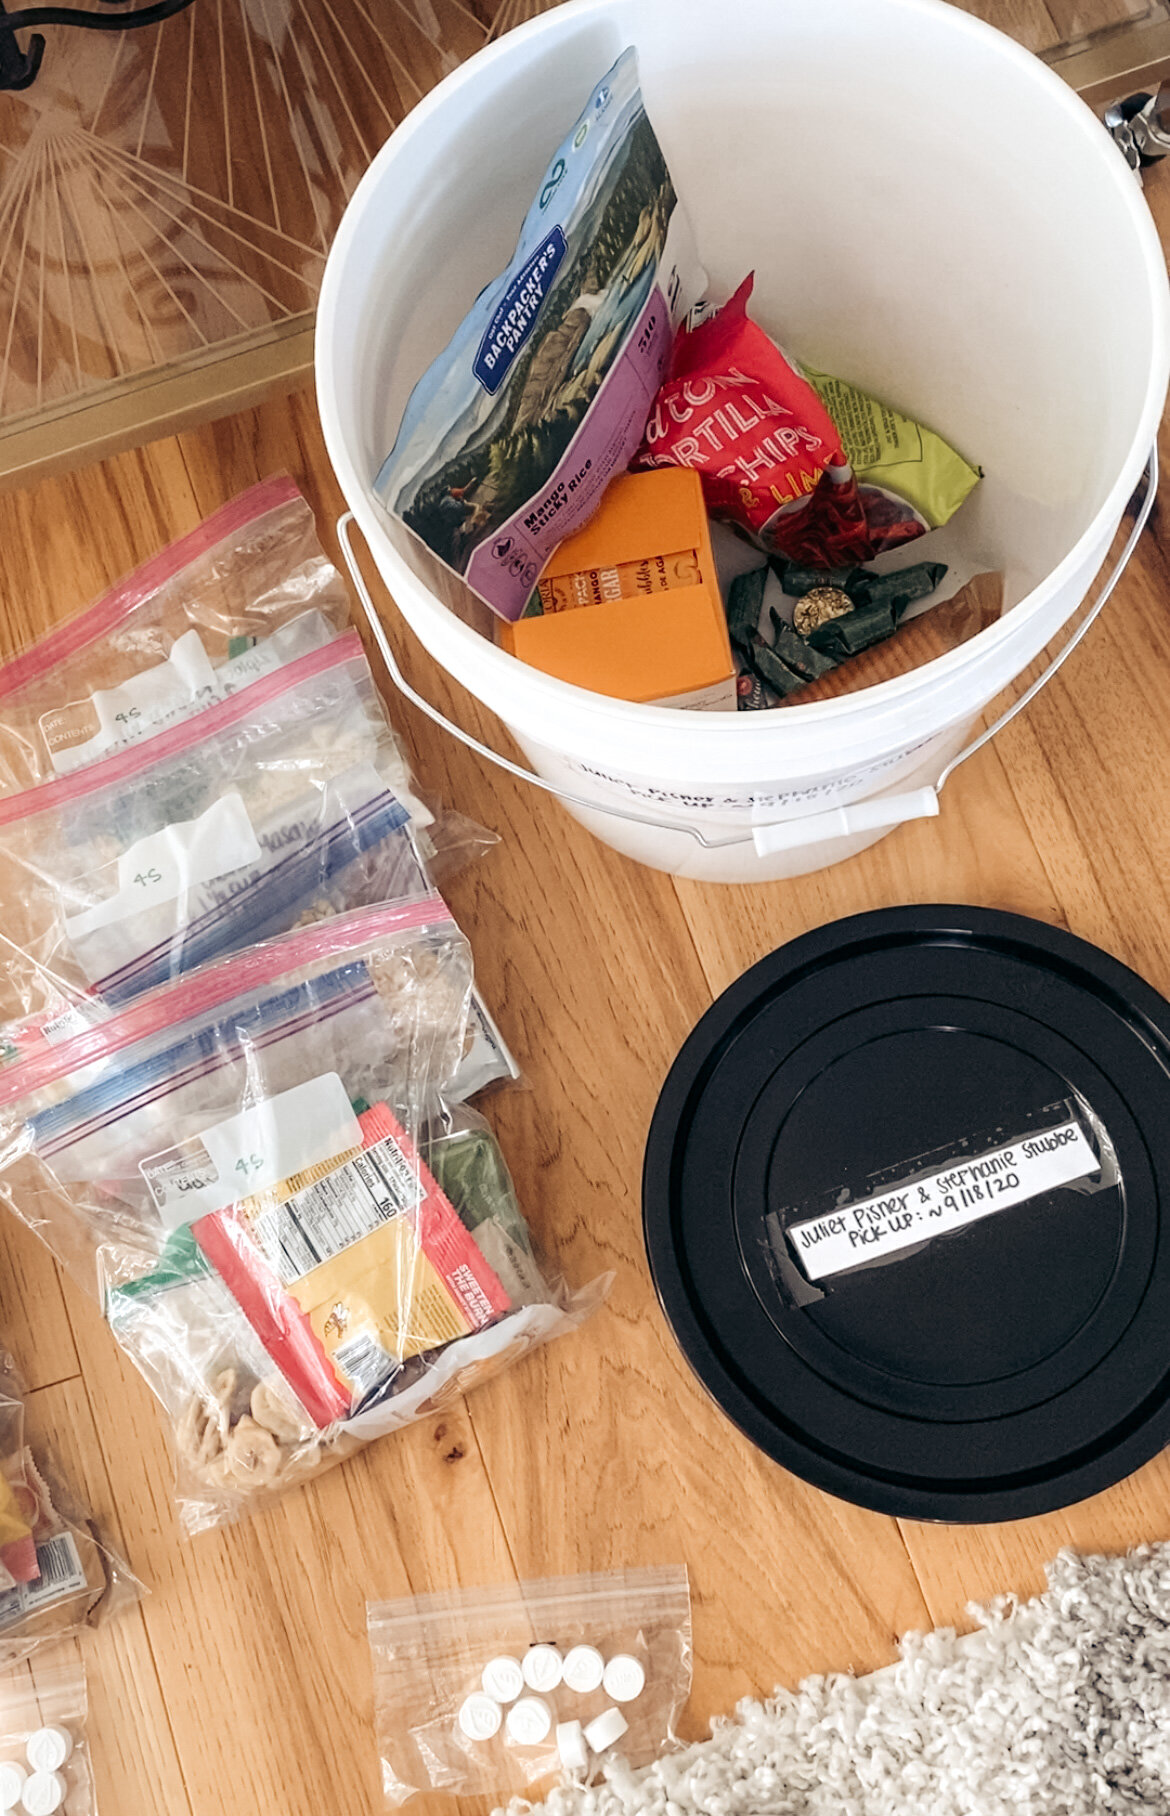
Step 2. Pack your resupply into a 5-gallon bucket. Place mailing label on the TOP of the bucket. Place label with name and expected pick-up date on the SIDE of the bucket.
Step 3. Three weeks prior to expected pick-up date, ship your resupply via USPS Priority Mail. Shipping fee is completely separate from the MTR payment in step one.
If you choose to drop off your resupply instead of shipping it, you can drop it off at Florence Lake beforehand for $30 fee. The road to Florence Lake is a very rough one lane road so it’s not the best option.
For more details, you can visit their website or email them at howdy@muirtrailranch.com. They are normally open from June to September 15th.

5. Onion Valley (mile 195.6)
This is the most inconvenient resupply stop but very necessary if you don’t want to carry 9-10 days of food out of MTR. I honestly couldn’t even fit that much food into my bear canister if I wanted! If you resupply in Onion Valley, you’ll have a 15-mile roundtrip detour over Kearsarge Pass to pick it up. Not ideal but what’s another 15 miles at that point? Here are your options if you choose to stop here:
Option 1 (most ideal). Find an extremely nice friend to hike in your resupply from the Onion Valley campground. Saves you 15 miles but may be hard to coordinate.
Option 2 (my choice). Drop off your resupply at the Onion Valley campground before you start your hike. There are large bear bins that you can place your resupply in. Make sure to label it with your name and expected pick-up date or the rangers will throw it out.
Option 3 (least ideal). If you can’t drop off your resupply beforehand, you can ship it to the Independence Post Office. This isn’t the best option as you not only have to hike out 15 miles, but also hitch a ride all the way into town. Not ideal but sounds like a fun adventure.
Your Name
c/o General Delivery
Independence, CA 93526
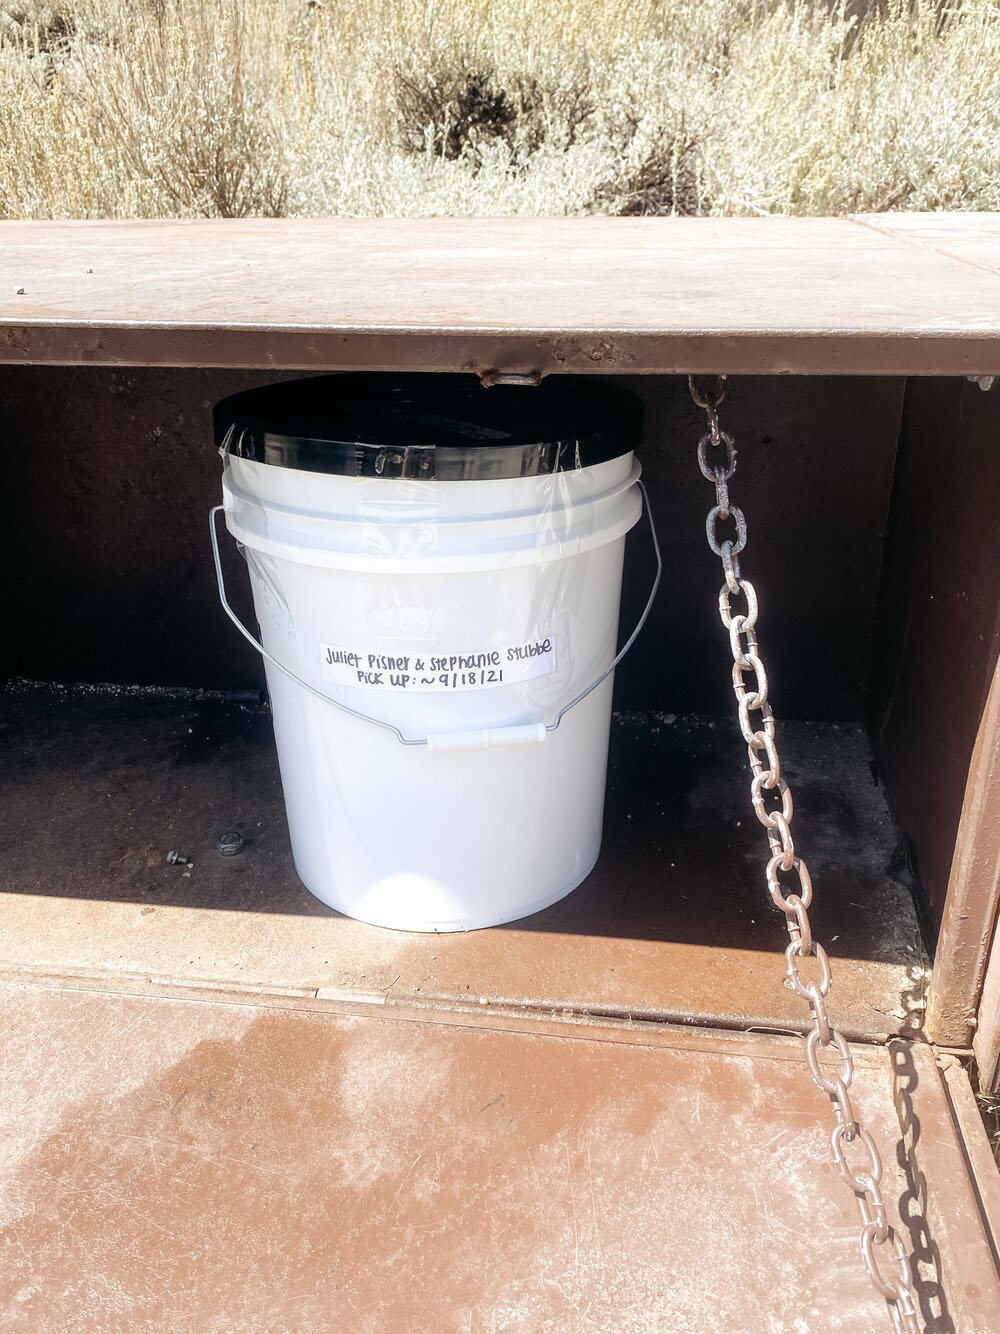
Onion Valley resupply left in a bear bin
What’s in each resupply?
To start, you need to plan your food for every day on the trail. Check out my complete backpacking food list and meal plan for meal ideas, grocery shopping lists, and repackaging tips. Once you finish meal prepping, organize each day of food into separate piles. Make sure you have enough meals and snacks in each one! You should also always carry an extra day of food in case of an emergency. Next, divide up your days of food by resupply points. For example, I resupplied three times and made four piles of food. Here is a breakdown of each of my piles:
1. Day 0 to 5 (starts in my bag) = 6 days of food (+ 1 day of emergency food)
2. Day 6 to 11 (Red’s Meadow) = 6 days of food (pack less if you plan to stop at VVR - they have a cafe!)
3. Day 12 to 17 (Muir Trail Ranch) = 6 days of food
4. Day 18 to 20 (Onion Valley) = 3 days of food
You should also include any extra supplies that you think you’ll need to replenish. This could include medications, wipes, toothpaste, Dr. Bronner’s, sunscreen, bug spray, hand sanitizer, hand warmers, trash bags, duct tape, batteries, toilet paper (or Portawipes), etc. I also packed a small shampoo and conditioner into my Red’s Meadow resupply to use for my coin shower.
Finally, add in some of your favorite treats or drinks that you can enjoy on resupply day! You’ll thank yourself a thousand times.
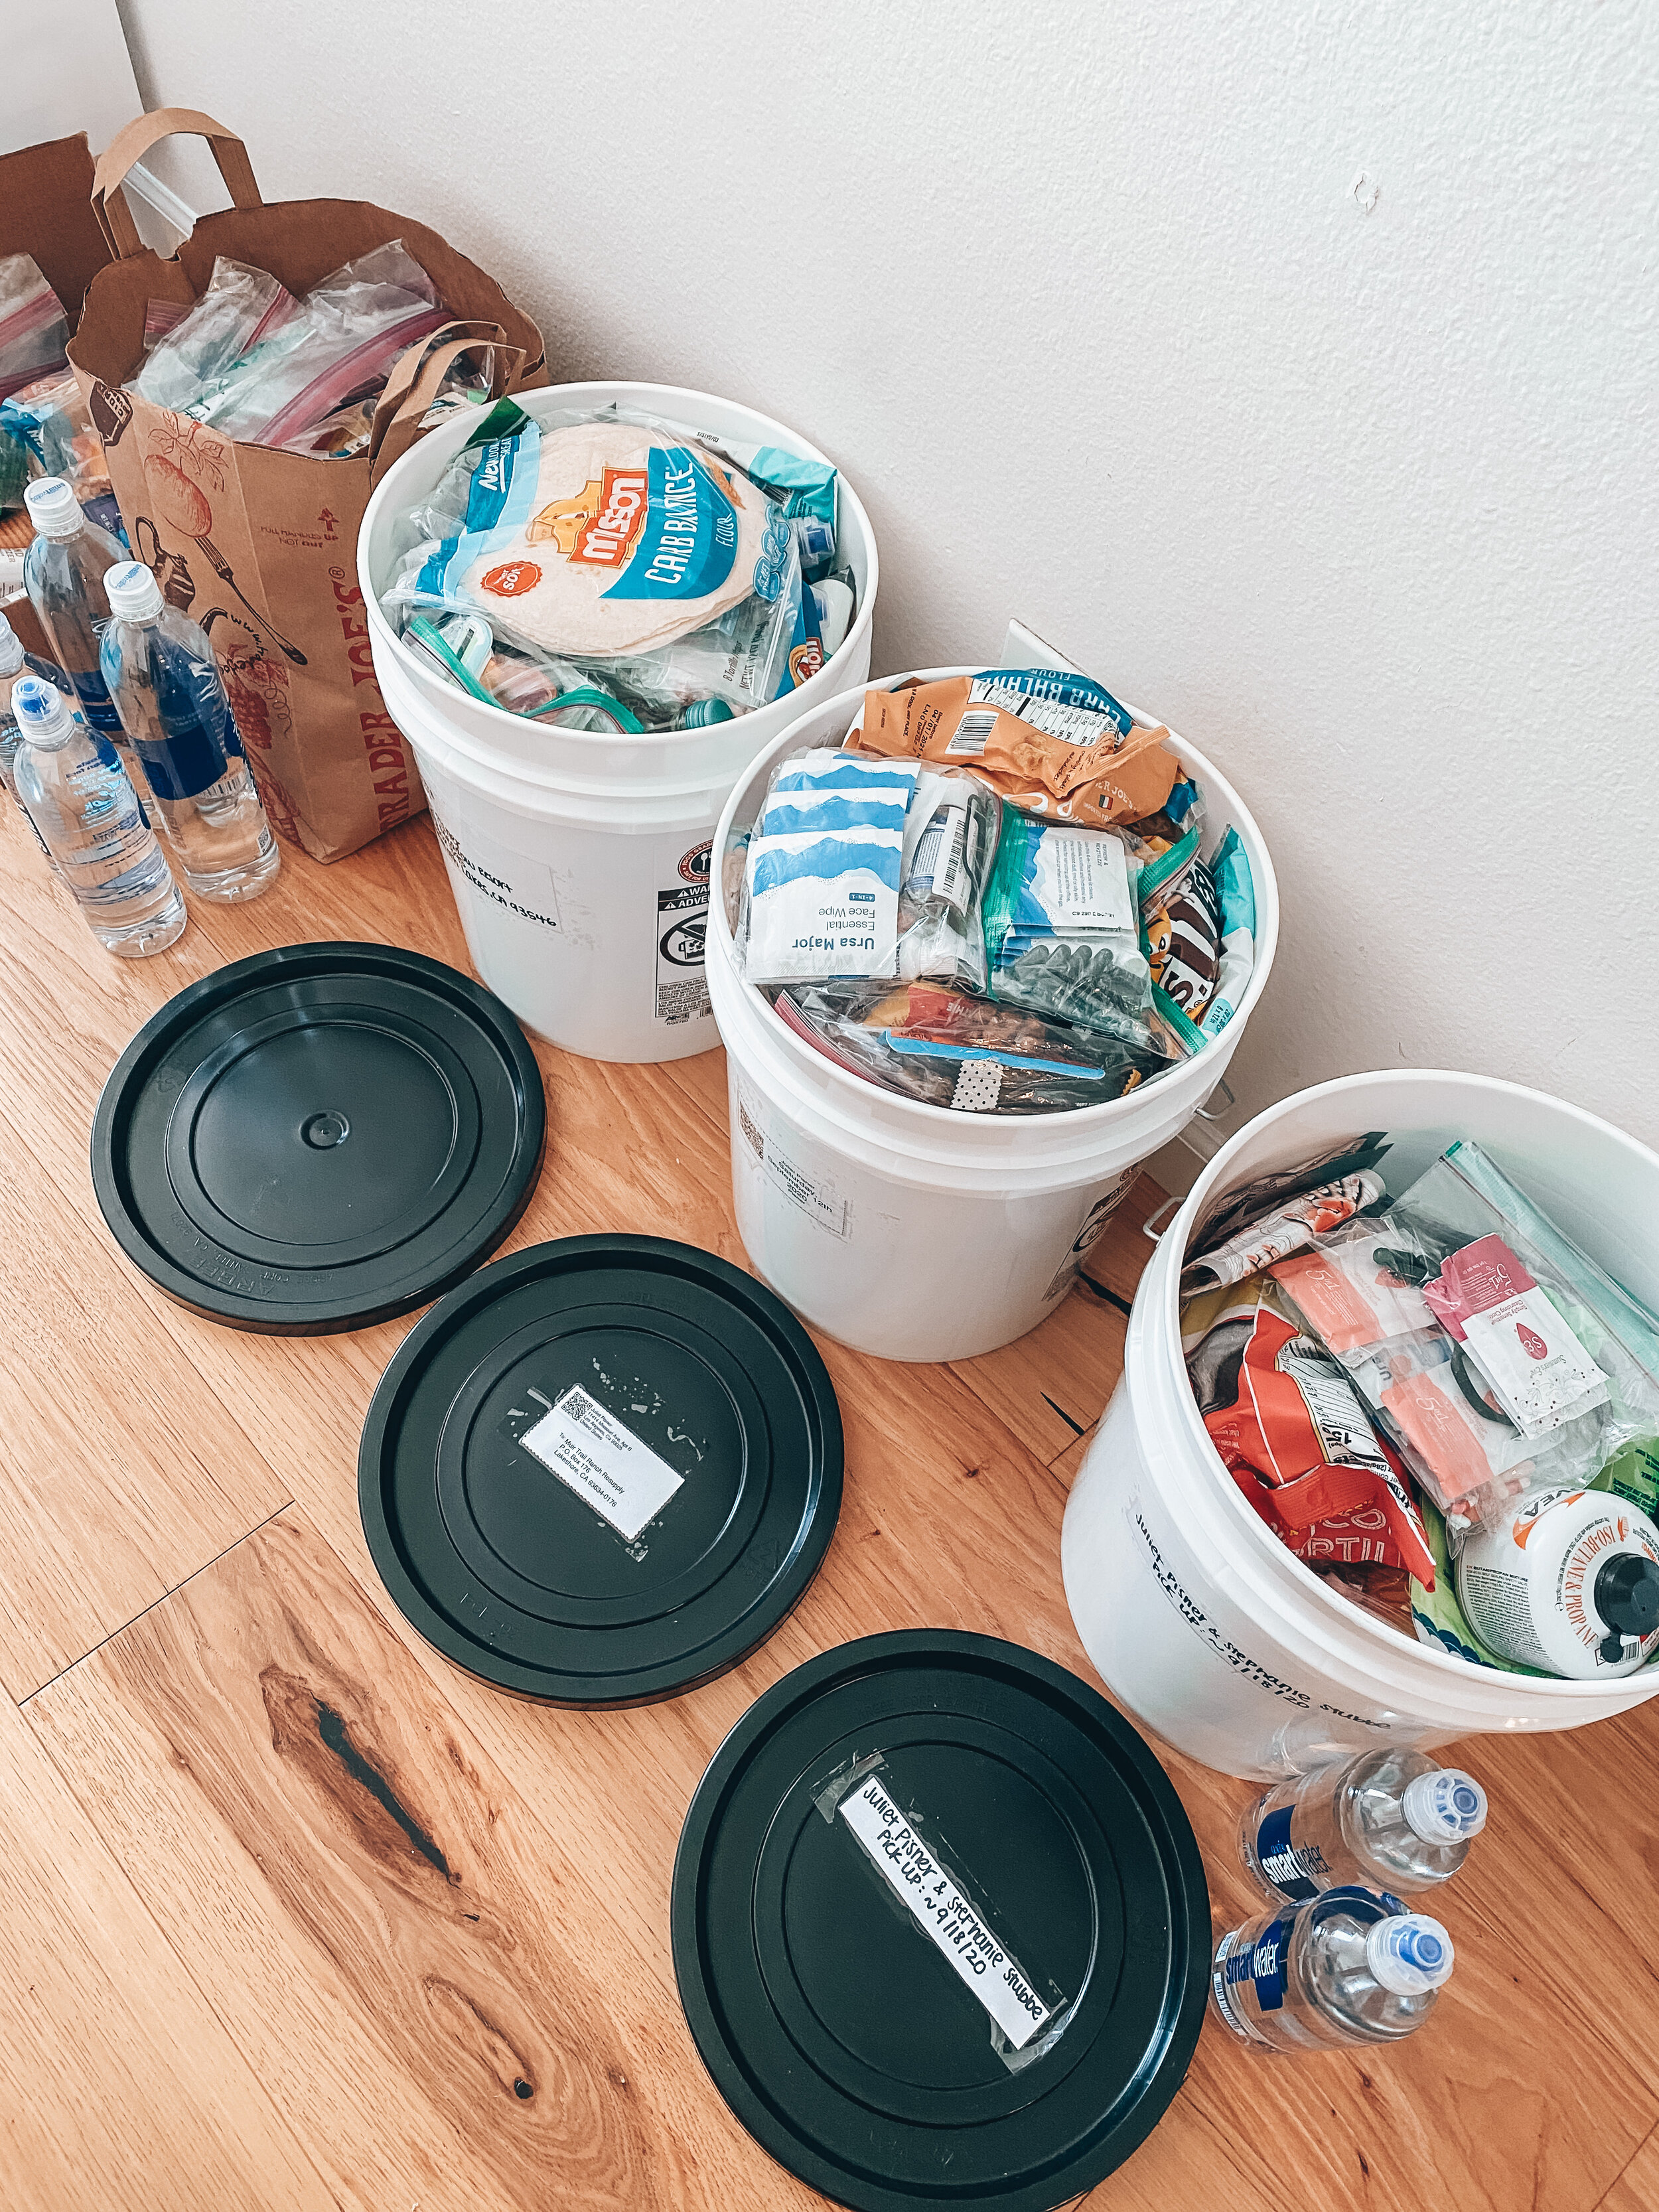
How do I pack my resupply?
Once you have each resupply pile ready to go, pack each one into a 5-gallon bucket. You can find these at your local home improvement store, like Home Depot or Lowes. Next, place any and all required labels (see above) on each bucket. This is extremely important as your bucket will get turned away if it’s not done correctly. Finally, triple check each bucket to make sure you’re not forgetting anything, then tape it up! You’ll want to tape down both the lid and the handle of the bucket using packing tape.
At this point, your buckets are taped up and ready to go. Three weeks before your expected pick-up date, head to the Post Office and ship them off…and get excited because you’re trip is very soon!

All done! Ready to ship out my resupply.